Substance designer and painter (SP) are awesome packages. If you're reading this, you probably agree. And, like me, you are probably also looking for a way to get those PBR textures to render nicely in mental ray (MR). Now I couldn't find any solution online, so instead I went to set out to see how I could reproduce SP rendering in MR. And I wouldn't be writing this if I didn't find something that seems to work ;)
If you just want the results, scroll down a bit to conclusion and you'll get the setup I ended up with.
First of all, let me mention I used the MR "mila_material". I started with a mia material, but mila is the future! And also much more convenient for our purposes. So; basic diffuse layer and a glossy reflect layer.
 |
| image 1 |
Step 1: Roughness
The first step is to just compare stuff. The mila_material has a fresnel based reflective specular with a roughness input. That already pretty much sounds like what a SP PBR shader consists of. So I threw a sphere in a SP and a Maya scene, gave them the same HDRI environment, and hit render. Then a moved the roughness sliders a bit and hit render again. I did that a couple of times and got this:
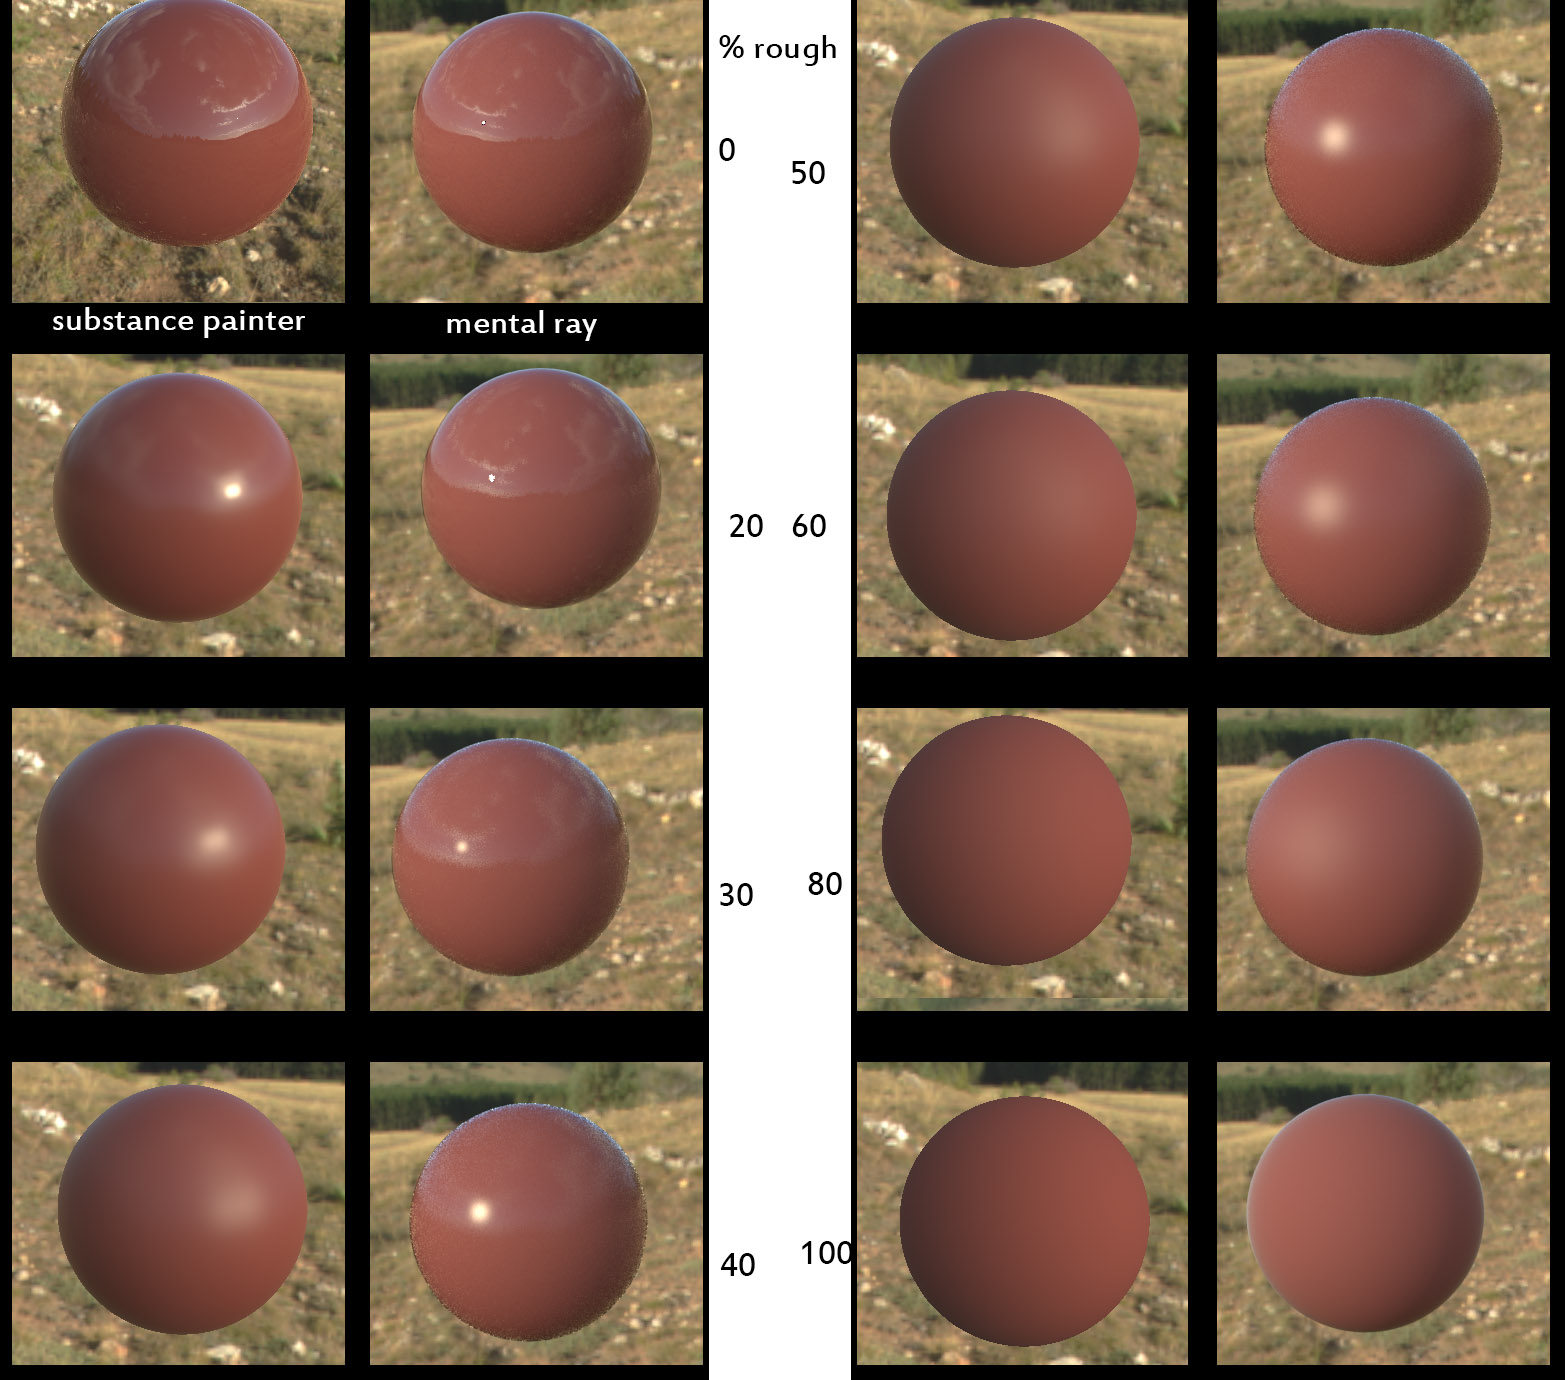 |
| image 2: roughness comparison |
So, at first glance, the 40% roughness in SP seems to correspond with about 75% roughness in mental ray. I figured I make a custom attribute on my sphere in maya, and patch it through a value remap node into the roughness on the mila_material, and see just remap the input values somewhat to have that custom value correspond properly with the SP roughness value.
What I got after some fiddling around is something that looked like this:
 |
| image 3: roughness remap curve |
For anyone who ever did anything with gamma correction, this value should sound familiar. Now I'm not entirely sure how SP was intended to work (and I am no expert on all this gamma stuff), but I've also noticed that in Marmoset, the gloss map needs to be flagged as 'sRGB space' to have the correct effect... also, a gloss map seems to be the inverse of roughness in sRGB space, while inversing it in linear space should give a totally different outcome... Whatever the case, a gamma correction of somewhere between 2.2 and 2.4 gives a good result (I prefer 2.4 myself, I want that roughness to really show)
Also, noticed how the higher roughness values leave the renders in MR much more shiny? It seems that in SP the specular values are toned down as roughness goes up. I went with a gut feeling and hooked up the inverse of the roughness through the same gamma correction and connected that the the specular tint. Again, left is SP, right is MR:
 |
| image 5: roughness affecting spec value |
Step 2: Metallic. I mean, fresnel.
There is no Metallic slider on the mila_material. But thats ok; there is a fresnel IOR slider. The substance folks have some really nice documentation on PBR, including some information on what to do with IOR. Read it if you haven't already. Anyway, first step is to get that non-metallic look to be the same. Left side; SP with 0% metallic, right side some mental ray renders.
 |
| image 6: iOR |
Non-metalic nailed. Then metallic. Getting ahead a bit; to render SP maps in mental ray, you will need to output them as diffuse/specular maps, as intended for the specular workflow. That means that any diffuse values get transferred to the specular map for metals. So with this test I set diffuse to black, and set the otherwise white spec value to our nice rubber ball red. Then I amped up the IOR all the way to 20.
These are the christmas balls I got, left SP, right MR:
 | |
| image 7 |
The metal turns out a bit darker in MR, but that is fine. Actually, it seems more accurate. Another difference actually is that blueish rim-light you see on top; that actually shouldn't be there. Not when working with a single fresnel pass anyway... Now I'm not sure if they should be there in the real world, but I like that bit of extra shine we get with the SP shader, so I thought I'd just reproduce it in MR.
Here is where those mila_materials work pretty nice; you can just add another glossy specular layer on the one that is handling your metal look. You'll get this:
 |
| image 8: setup for a metallic surface (The roughness on that extra layer should go down to 0.) |
Step 3: texture testing!
So, time to start hooking up textures. It took some fiddeling and experimenting, but this is what I got initially:
 |
| image 9 |
Not bad. It seems that SP renders a lot crisper though (and I found the same between SP and Marmoset Toolbag). It helps to switch off filtering for the textures, which I did for all textures in the right image. MR doesn't need that filtering anyway, at least not for still renders. Also, MR is a lot more sensitive to rendering normal maps with edges that are baked a bit off, something that often happens with z-brush reprojections.
The results are not 100% identical, and I welcome any tips for a better approximation, but for now I'm pretty content. So, for those of you that are looking for the final setup:
Conclusion
This is the mila_material setup I use (with exception of the base layer; these layers are built top-down.. so the top layer is the first one I added):
 |
| image 10: basic setup |
 |
| image 11 |
Hooked up behind the scenes:
- Diffuse map to color in the Base layer
- Specular map to color in the 'reflect_dielectric' layer
- Normal map via a regular 2d bump node to the Bump slots for all layers (if you wonder why; mila_materials allow for nice effects like smooth coatings on a rough surface, by having a smooth normal map on the glossy reflect layer and a rough normal map in the diffuse underneath.)
- Roughness map* through a gamma correction node (value 2.2) to the roughness on all reflect layers.
- Metallic map* to the weight channels of 'reflect_metal' and 'reflect_metal_shine'(which is the channel for that extra bit of fresnel I mentioned earlier), and mapped through a reverse node to the weight of the 'reflect_dielectric' layer. Actually, I also ran this map through the gamma correct node. This map would mostly be black and white, but in transition area's it wouldn't be, and I just assumed this correction would also be required. Not sure if it is though, that requires a bit of testing.
- Opacity (not applied in the screenshots, but succesfully tested) via a reverse node to the weight channel of a new weighted layer set to "transparency", leaving its transparancy color to white.
*Note: You'll need to use their alpha-out channels. Don't forget to flag "Alpha Is Luminance" checkbox under the "file>color balance" tab for your textures.
So:
 | |
| image 12: basic graph |
Some considerations; it would be possible to use just one layer for reflect_metal and reflect_dielectric, by mapping the Metallic map through a 'remap values' node for example, so that black reads as 1.4 and white as 20, and plug it in the Ior channel in the consolidated reflect layer. I for one prefer to work that way, because less layers is always better. But in this case not more manageable;
The problem is that you need to plug the specular map in the color for the layer that handles metal reflections. But for non-metals, SP outputs a very dark grey-ish specular value, while in MR want this value to be white be white.
... Or actually; a higher roughness value seems to lower the reflected value for nonmetals in SP compared to MR (see first image), so the relation is probably more complex. For accurate reproduction you might want to have the inverse of your (non-gamma-corrected) roughness map connected to your specular channel... probably run through a inverse gamma correction or something actually :D This would require further testing I suppose, but anyhow; it makes life easier to just have a separate layers for the metallic and nonmetallic reflections.
Another thing is that that gamma-correction applied to the roughness map is probably somehow manageable via color management. I didn't get proper results playing around with maya's color management though, and it seems that mental ray ignores any settings on the file node itself concerning the color profile. I just use a node for the correction